Ok, We've Heard Enough.
Let's Start Coding!
First of all, so we don't reinvent the wheel, we're going to be relying on an existing 3D Javascript library. We want a library that can give us all the tools we need to create our own WebGL experiences from start to finish.
There's a lot of libraries out there, but the most popular ones are three.js & babylon.js.
For the sake of this lecture, we're going to be focusing on babylon.js, because it's more user-friendly and faster to learn.
The great thing about babylon.js is that it's also very visual. Go to their website, and click on the PLAYGROUND icon. This is how it's going to look:
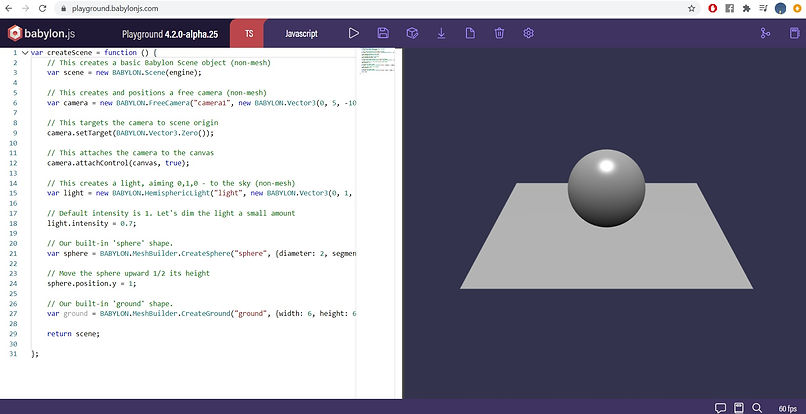
There's lots to do & learn here, so we're going to be brief.
If you want to learn more in depth, babylon.js has lots of information online and a very active community. Check out these resources:
In the Playground, on the left side, is where you write your code.
Notice there's already some code written - this code creates our 3D scene, seen on the right.
Drag around with your mouse and look at the sphere and ground from different angles.
This is exactly how the user is going to experience your scene.
While coding, if you want to see the outcomes of what you're building - press the PLAY icon in the top toolbar.
With the DOWNLOAD option, you can tranform your scene into a working index.html file, and save it on your computer.
Try this now, and integrate the index.html into your WIX website, like we've shown before:
The final part of this lecture is going to be with live coding, so we can play around freely:
Here below is a 3D Viewer code template.
Copy it into Babylon's Playground, and hit the PLAY icon.
In the code, there are explanations on the different parts of it - any line that starts with // is an explanation, and not the actual code.
Change the parameters as you wish, to fit your model and style.
Then click DOWNLOAD and get that index.html. :)
To change the bottle example to your own model, I've marked the code below in 4 colors.
Change these to your own model & texture HTTPS location, on your cloud service.
Don't delete the "" by mistake, the links to your model & texture need to be inside these "".
Here's an explanation of the 4 colors:
Green:
This is the HTTPS location of the folder that holds your model, on the cloud.
Red:
This is the actual name of your model's file. In this example - Corona.obj
Make sure to write this correctly.
Babylon JS does not work with FBX file formats.
Pink:
This is a name I gave the model in the code. In this example - bottle
you can change this name as you wish, just make sure to always refer to your new name anywhere that is needed in the code.
Orange:
This is the HTTPS location of the texture image (jpg or png file) of your model, on the cloud.
Here's the code, copy from here, on:
var createScene = function () {
var scene = new BABYLON.Scene(engine);
// Adding an Arc Rotate Camera, change the number "20" to whatever zoom amount you want the camera to have from your model
var camera = new BABYLON.ArcRotateCamera("camera", BABYLON.Tools.ToRadians(90), BABYLON.Tools.ToRadians(65), 20, BABYLON.Vector3.Zero(), scene);
camera.attachControl(canvas, true);
// Scrolling down the website will not affect zoom in & out of the model, delete if you want otherwise
camera.inputs.attached.mousewheel.detachControl(canvas);
// Color of the canvas, currently it's transparent
scene.clearColor = new BABYLON.Color4(0, 0, 0, 0);
// This creates a light, the 3 numbers after Vector3 are the XYZ position of the light in the 3D scene, change as you wish
var light = new BABYLON.HemisphericLight("light", new BABYLON.Vector3(35, 0, 0), scene);
// Default intensity is 1. Let's strengthen the light a small amount, and give it color
light.intensity = 1.3;
light.diffuse = new BABYLON.Color3(1, 1, 1);
light.specular = new BABYLON.Color3(0.15, 0.18, 0.21, 0.03);
// The first parameter can be used to specify which mesh to import. Here we import all meshes
BABYLON.SceneLoader.ImportMesh("", "https://musrara1.s3.me-south-1.amazonaws.com/add1/test1/", "Corona.obj", scene, function (newMeshes) {
// Gives a name to the imported mesh, use this name further on, always
var bottle = newMeshes[0];
// Position & Rotation & Scaling of the imported mesh, change at will
bottle.position.x = 0;
bottle.position.y = -6;
bottle.position.z = 0;
bottle.rotation.x = 55;
bottle.rotation.y = 0;
bottle.rotation.z = 10;
bottle.scaling.x = 0.3;
bottle.scaling.y = 0.3;
bottle.scaling.z = 0.3;
// Gives a material and a texture to the imported mesh
var material1 = new BABYLON.StandardMaterial;
bottle.material = material1;
material1.diffuseTexture = new BABYLON.Texture("https://musrara1.s3.me-south-1.amazonaws.com/add1/test1/BotellaText.jpg", scene);
});
return scene;
};